Guide for Frame Assembly
If your preference is to have your frame(s) delivered pre-joined, please note it on the special instructions field in the shopping cart, or respond to your order confirmation with this request and we will do our best to accommodate you, if it is feasible.
The following easy steps will guide you to assemble your custom frame(s). Special tools are NOT required and results are guaranteed.
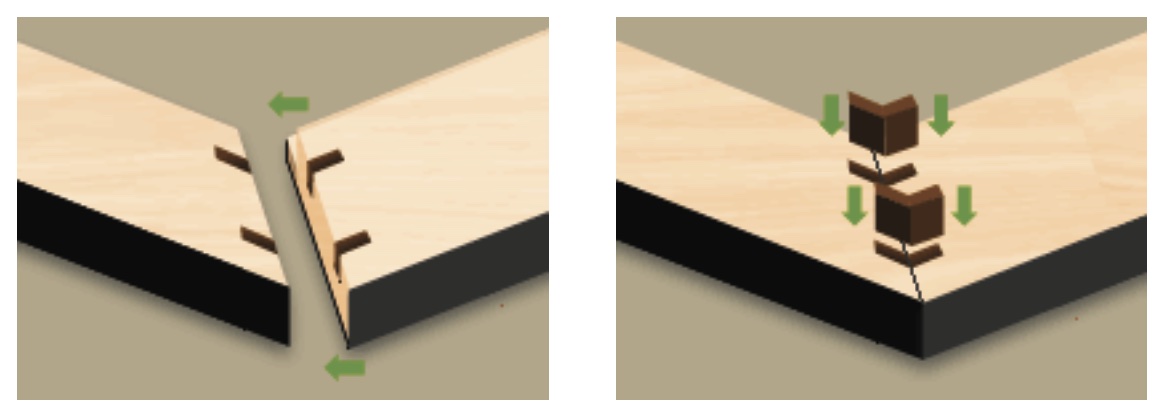
1. Place the custom frame lengths face down on a flat surface.
2. Apply a small amount of wood glue on the ends of the frame. Any wood glue, such as Elmer’s or Gorilla Wood Glue should suffice. Next, align each frame corner and add thumbnail inserts into the routed slots. If necessary, a hammer can be used to lightly tap it in.
3. Turn the frame over gently so that it is flat on its back. Make sure the corners are tight, remove any excess glue and allow it to set.
For assembling heavier frames or framing very heavy objects (e.g. mirrors), add additional support to the frame corners, using steel angles that can be purchased from a local hardware store (this should only cost a few dollars).
Securing Contents of Frame with Hardware
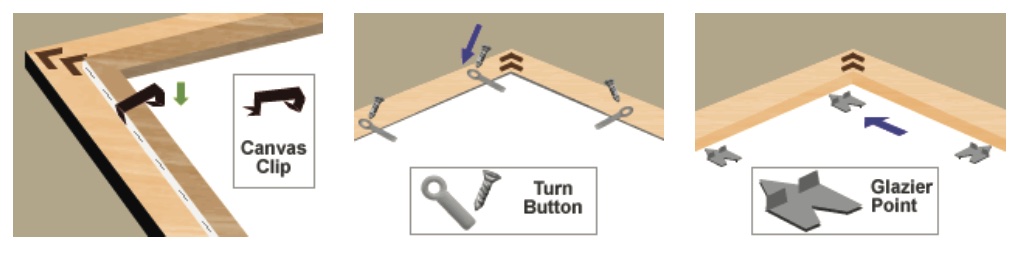
When frame contents are recessed:
1. Face the frame down with all the contents loaded into the frame. Take one glazier point and place the flat bottom side on the back of the foam board.
2. Push the pointed edge of the glazier point into the side wall of the frame (you may need to use a flat-head screwdriver if the wood is too hard).
3. Repeat previous steps with a glazier point positioned every 10 to 12 inches along the perimeter of the frame.
When frame contents are flush:
1. Face the frame down with all the contents loaded into the frame, place a turn button on the frame edge so that the arm of the turn button hangs over the contents of the frame.
2. Insert a screw through the turn button hole and the frame.
3. Repeat the previous steps with a turn button positioned every 10 to 12 inches along the perimeter of the frame.
Securing canvases that protrude:
1. Gently insert double-pronged end of the canvas clip between the wooden frame and stretcher bar.
2. Push the canvas clip into position over the stretcher bar ensuring that it is secure.
3. Repeat previous steps on each side of the frame (larger frames may require multiple canvas clips per side).
Hanging Frame with Hardware
For medium to large frames:
1. Make sure the framed artwork is facing down on a flat surface, then screw in a loophole hanger on both sides of the frame, roughly three-quarters of the way up.
2. Thread both ends of the braided wire through each of the loophole hangers. Then, make sure to wrap approximately 6 inches of each end of the wire over and around itself at least 5 times.
3. Place the center of the arch-braided wire over a wall hanger and adjust as needed.
For small frames:
1. Ensure the framed artwork is facing down on a flat surface, then secure a sawtooth hanger to the top center of the frame back.
2. The frame can be hung by positioning the center notch over a nail or screw on the wall.

Have a question? Email us at [email protected] or use the website chat!